
zoom h2n handy recorder manual
The Zoom H2N Handy Recorder is a portable, user-friendly audio recording device designed for capturing high-quality sound in various environments. Known for its durability and versatile microphone system, it supports multiple recording modes, making it ideal for content creators, musicians, and podcasters seeking professional-grade audio. This guide provides a comprehensive overview of its features, setup, and operation.
Overview of the Zoom H2N
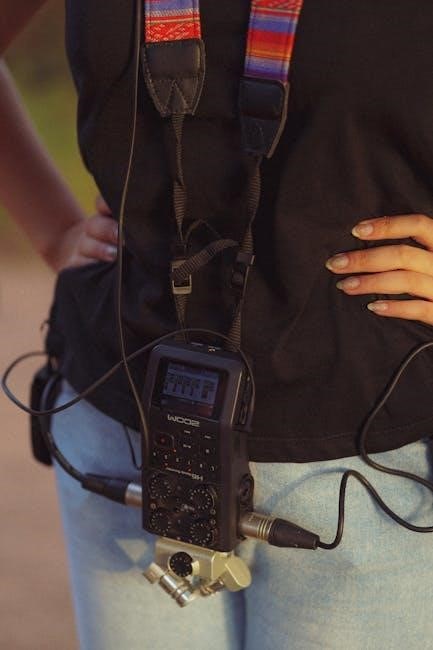
The Zoom H2N Handy Recorder is a compact, portable device designed for capturing high-quality audio in various environments. It features a built-in microphone system with mid-side (MS) and XY stereo configurations, allowing for versatile recording options. The device supports WAV and MP3 formats, with adjustable sample rates and bit depths. Its intuitive interface and durability make it ideal for podcasters, musicians, and field recordists. The H2N also includes a built-in speaker, pre-recording functionality, and compatibility with external microphones, ensuring flexibility for different recording needs.
Key Features of the Zoom H2N
The Zoom H2N boasts a 5-microphone system, offering MS, XY, and 360-degree surround sound modes. It records in WAV up to 24-bit/96kHz and MP3 formats. The device features a 1.8-inch LCD screen, built-in speaker, and pre-recording buffer. It supports SD cards up to 128GB and includes a USB 2.0 interface for file transfer. The H2N operates on 2 AA batteries, offering up to 15 hours of recording. Additional features include automatic gain control, low-cut filter, and a high-volume headphone jack for accurate monitoring.

Components and Accessories of the Zoom H2N
The Zoom H2N includes a built-in 5-microphone system, 1.8-inch LCD screen, and SD card slot. Accessories like the AC adapter, USB cable, and protective case enhance functionality and portability.
Physical Components of the Recorder
The Zoom H2N features a 1.8-inch color LCD screen for easy navigation and menu access. It includes a built-in 5-microphone system, supporting XY, MS, and surround sound modes. The recorder has a microSD card slot, a USB port for computer connectivity, and a 3.5mm line out/headphone jack. It operates on two AA batteries, providing up to 15 hours of runtime. The compact, lightweight design makes it portable and ideal for field recordings. Physical buttons and a gain wheel allow intuitive control over settings and audio levels during operation.
Optional Accessories for the Zoom H2N
The Zoom H2N can be enhanced with optional accessories for improved functionality. The APH-2n accessory pack includes a windscreen, protective case, and AC adapter. A dedicated windshield (WSU-1H) reduces wind noise for outdoor recordings. The AD-17 AC adapter provides constant power during extended sessions. Additionally, external microphones can be connected via the 3.5mm input, expanding recording options. These accessories are available on the Zoom website and authorized retailers, offering tailored solutions for specific recording needs and environments.

Setting Up the Zoom H2N
Insert batteries or SD card, power on, and follow the manual for initial setup. The recorder is ready to use with minimal configuration.
Initial Setup and Powering On

To begin using the Zoom H2N, insert 2 AA batteries or an SD card (not included). Locate the Power switch on the side, pull it down, and hold until the screen lights up. The device is now powered on. Ensure the SD card is properly formatted for recording. Refer to the manual for detailed setup instructions and safety precautions to ensure optimal performance and longevity of the recorder.
Formatting the SD Card
Formatting the SD card is essential for proper operation of the Zoom H2N. Access the menu by pressing the Menu button on the side. Scroll down to the “Format” option and select it. Choose “SD Card” to begin formatting, which will erase all data on the card. Confirm the action to proceed. Ensure the SD card is compatible and formatted correctly before use to avoid recording issues. This step ensures optimal performance and prevents errors during recording sessions.
Choosing the Right Folder for Recordings
Selecting the appropriate folder for recordings on the Zoom H2N ensures organized file management. Access the menu by pressing the Menu button, then navigate to the “Folder” option. Choose from the available folders or create a new one to store your recordings. This feature helps categorize your audio files, making it easier to locate and manage them later. If no folder is selected, recordings will default to a predefined location. Proper folder selection enhances workflow efficiency and reduces the risk of misplacing important audio files.

Recording Settings and Modes
The Zoom H2N offers customizable recording settings and modes, including MS, XY, and Surround, allowing users to capture audio with precision. Adjust formats, levels, and configurations for optimal sound quality.
Selecting the Record Format
Selecting the appropriate record format on the Zoom H2N is essential for achieving desired audio quality. The recorder supports various formats, including WAV (up to 24-bit/96kHz) and MP3 (up to 320kbps). For high-quality recordings, WAV 48kHz/24-bit is recommended as a starting point. To change the format, navigate to the Menu, select Rec Settings, and choose your preferred option. This ensures compatibility with your recording needs, whether for professional projects or casual use.
Adjusting Recording Levels
Properly adjusting recording levels is crucial for clear and distortion-free audio. On the Zoom H2N, levels can be adjusted using the Mic Gain Wheel. Aim for peak levels between -18 and -6 dB to avoid distortion. Monitor levels on the LCD screen and adjust as needed. Use the built-in limiter to prevent sudden volume spikes. For playback, adjust the volume using the Volume buttons. This ensures optimal sound quality and prevents issues during recording or playback.
Understanding Recording Modes (MS, XY, Surround)
The Zoom H2N offers three main recording modes: MS (Mid-Side), XY, and Surround. MS mode uses rear-facing microphones for a focused, adjustable stereo image, ideal for post-production. XY mode captures a wide, immersive soundstage with front-facing microphones, perfect for live recording. Surround mode records 360-degree audio, simulating a spatial environment, great for film or environmental projects. Each mode tailors the recording to specific scenarios, ensuring high-quality audio capture. Use the menu to switch modes and optimize microphone levels for the best results. This versatility makes the H2N a powerful tool for diverse applications.
The Recording Process
Start recording by pressing the red button; stop by pressing it again. Use the pre-recording function to capture two seconds before starting. Switch modes effortlessly during sessions.
Starting and Stopping a Recording
To begin recording, press the red button located on the front of the H2N. The red LED will illuminate, and “REC” will appear on the screen, indicating an active recording session. To stop recording, press the red button again. The pre-recording function can be enabled to capture up to two seconds of audio before manually starting the recording. This feature is useful for ensuring no important moments are missed. Recordings can also be started or stopped via the menu options. Ensure the SD card has sufficient space and the battery level is adequate before starting.
Using the Pre-Recording Function
The Zoom H2N features a pre-recording function that captures up to two seconds of audio before you manually start recording. To enable this, navigate to the menu, select the pre-recording option, and set it to “On.” This function ensures that important moments are not missed. When activated, the recorder will continuously buffer audio but will not save it until you press the record button. This feature is particularly useful for capturing spontaneous sounds or interviews. Ensure the device is powered on and the SD card is properly inserted before using this function.
Switching Between MS and XY Modes
The Zoom H2N allows seamless switching between Mid-Side (MS) and XY microphone modes. MS mode is ideal for capturing a wide stereo image with adjustable side microphones, offering flexibility in post-production. XY mode is suited for accurate stereo recording with a focused front pickup. To switch modes, navigate to the menu, select “Mic Capsule,” and choose the desired mode. This feature enhances recording versatility, catering to different audio capture needs. Ensure the mode is selected before starting a recording for optimal results.

Playback and File Management
The Zoom H2N offers intuitive playback features and efficient file organization. Use the play/pause button to review recordings and navigate through files using the scroll wheel. Easily manage and organize your audio files on the SD card, ensuring seamless access to your recordings. This functionality simplifies post-recording workflows, making it easy to locate and manage your captured audio content efficiently.
Playing Back Recordings
The Zoom H2N allows you to playback recordings directly on the device. Use the play/pause button to start or stop playback, and navigate through files using the scroll wheel. The device displays recording details like file name, duration, and format on its LCD screen. Adjust playback volume using the volume buttons located on the side. For better sound quality, connect headphones or use the built-in speaker. This feature is ideal for reviewing recordings on the spot, ensuring you capture the audio you need. The H2N also supports transferring files to a computer for further editing or sharing.
Navigating and Organizing Files
Navigating and organizing files on the Zoom H2N is straightforward. Access the menu by pressing the Menu button, then use the scroll wheel to browse through folders and files. The H2N organizes recordings into folders, which can be selected during setup. Files are automatically named with timestamps, making it easy to identify recordings. You can also rename files or delete unnecessary ones directly on the device. The H2N supports SD cards for storage, allowing you to transfer files to a computer for editing or archiving. This system ensures efficient file management and quick access to your recordings.

Advanced Features of the Zoom H2N
The Zoom H2N features a built-in speaker for instant playback, customizable settings for tailored recording experiences, and advanced microphone configurations for enhanced audio capture flexibility.
Using the Built-In Speaker
The Zoom H2N’s built-in speaker allows for convenient playback of recordings without external devices. To use it, press the play button and adjust the volume using the buttons on the side. The speaker is ideal for quick review sessions, ensuring audio quality and accuracy. It’s energy-efficient, preserving battery life, and offers clear sound reproduction, making it essential for field recordings and instant feedback needs while on the go.
Accessing the Menu and Custom Settings
To access the menu on the Zoom H2N, press the Menu button located on the side of the device. Use the navigation wheel to scroll through options like recording format, levels, and folder selection. Custom settings allow you to tailor the recorder to your needs, such as adjusting mic gain or selecting recording modes. Press the OK button to save changes. The menu also provides access to advanced features like pre-recording and low-cut filter settings, ensuring a personalized recording experience. This user-friendly interface makes it easy to optimize your recordings efficiently.

Safety Precautions and Troubleshooting
Handle the H2N with care to avoid damage. Use only approved batteries and accessories. Troubleshoot issues like distorted audio by adjusting mic gain or checking power settings.
Important Safety Information
Always follow the safety guidelines outlined in the Zoom H2N manual. Warnings indicate potential serious injury or death, while cautions highlight risks of damage or injury. Use only the approved ZOOM AD-17 power adapter to avoid fire hazards. Keep the recorder away from water and extreme temperatures; Never disassemble the device, as this voids the warranty. Handle batteries with care to prevent leakage or explosion. Ensure proper ventilation to prevent overheating; Follow all instructions carefully to ensure safe and reliable operation of the Zoom H2N Handy Recorder.
Common Issues and Solutions
Common issues with the Zoom H2N include low recording levels, distorted audio, and SD card errors. For low levels, adjust the Mic Gain Wheel to optimize the signal. Distortion often results from excessive gain; reduce the gain or enable the Auto Gain feature. SD card errors may occur if the card is not formatted correctly. Format the card directly on the device using the Menu > Format option. Regularly updating the firmware ensures compatibility and resolves bugs. Refer to the ZOOM H2N manual for detailed troubleshooting steps and solutions.
Downloading and Updating Software
Visit the official ZOOM website to download the latest firmware and supplementary manuals for the H2N. Firmware updates enhance functionality, while PDF and ePub manuals provide detailed guides for optimal use.
Updating the Firmware
To update the ZOOM H2N firmware, visit the official ZOOM website and download the latest version. Connect the recorder to your computer via USB and follow the on-screen instructions. Ensure the device is fully charged or powered by the ZOOM AD-17 adapter during the update to prevent interruptions. Once the update is complete, restart the H2N to apply the new firmware, enhancing its performance and functionality with the latest features and improvements.
Downloading and Installing Drivers
To ensure optimal performance, download and install the latest drivers for the ZOOM H2N from the official ZOOM website. Navigate to the support section, select the H Series ASIO Driver, and choose the appropriate version for your operating system. Run the installer and follow the prompts to complete the installation. After installation, connect the H2N to your computer via USB. The device will be recognized, enabling audio interface functionality. Restart your computer if prompted to ensure proper driver integration and functionality. This step is crucial for seamless operation and compatibility.
The Zoom H2N Handy Recorder is a powerful, versatile tool for capturing high-quality audio. Its ease of use and robust features make it ideal for creators seeking professional sound.
Final Tips for Using the Zoom H2N
For optimal performance, always format the SD card before use and select the appropriate folder for recordings. Adjust recording levels carefully to avoid distortion, and experiment with MS, XY, and surround modes for desired audio capture. Use the pre-recording function to never miss important moments. Regularly update the firmware and use recommended accessories like wind protection for clear sound. Organize files efficiently and backup recordings frequently. Refer to the manual for troubleshooting common issues and explore advanced settings for personalized use.